
Contractor measurement guide
Pool cover measurement guide: what to send for a quotation
A length and width without named endpoints can send a custom pool cover quote back for revision. Send a labelled plan with units, both diagonals, edge details, available mechanism or roller space, and photos tied to the drawing.
Download blank measurement sheet (CSV)
Start with the finished pool geometry and mark which dimensions are measured on site, taken from drawings, or still unknown. For automatic covers, add the proposed travel direction and track corridor; for a manual cover, show the roller position and handling space. The checklist below supports a first quotation discussion. Release custom dimensions only after the installer verifies the selected configuration drawing.
Measure from named points and one reference surface
Label the pool corners A, B, C and D in order on a plan. State whether each measurement runs between finished inside faces, coping edges or proposed track lines. Keep those references separate. Record all sides, widths at marked stations, and both corner-to-corner diagonals; show the stations on the sketch so another person can repeat the measurements.
For curves, steps, a spa or a swim-out, sketch the feature with its location and dimensions. Ask for the selected cover supplier’s shape-measurement form before preparing a detailed freeform survey. An overall bounding rectangle alone does not locate those features.
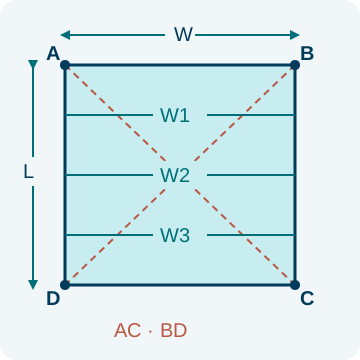
L and W: overall inside dimensions.
W1–W3: repeated widths, with their positions recorded.
AC and BD: measure both diagonals independently.
Use the diagonal as a cross-check
For a true rectangle, use the formula below. The worked example assumes inside dimensions of 8 m by 4 m; these are geometry inputs, not a cover size or order.
d = √(L² + W²)
L = 8 m, W = 4 m: d = √(8² + 4²) = √80 ≈ 8.944 m
Record measured AC and BD separately alongside the assumed rectangle. If they differ, recheck endpoints, units and geometry before submitting the dimensions. Equal diagonals alone do not prove the pool is rectangular. The selected configuration drawing must define any acceptance tolerances; this guide supplies no installation tolerance.
Add the details required by the cover arrangement
Choose the arrangement being discussed, then document the space it would occupy. A track-guided automatic cover needs a different site record from a manually handled cover or a replacement component.
| Inquiry | Record in addition to pool geometry | Dominant failure mode & prevention |
|---|---|---|
| InquiryTrack-guided automatic cover | Record in addition to pool geometryProposed parallel track corridors, travel direction, coping section, mechanism location and service access | Dominant failure mode & preventionA projecting feature conflicts with the proposed path: locate it on plan and obtain a revised configuration drawing before fixing the layout. |
| InquiryManual cover and roller | Record in addition to pool geometryPool outline, selected cover type, proposed roller location and available handling/storage space | Dominant failure mode & preventionA roller has nowhere to stand or move: show the whole handling area, including fixed obstacles, before matching the assembly. |
| InquiryReplacement cover or component | Record in addition to pool geometryExisting system identification, part photos, fixing positions and measured interfaces | Dominant failure mode & preventionA similar-looking part does not match: use the existing model/part record and interface measurements for fitment review. |
Separate water dimensions from coping and equipment space
Add an edge section showing the finished deck, coping projection, inside pool face and operating waterline. State skimmer or overflow construction and show any gutter, raised wall or adjacent spa. Record the clear available housing or roller envelope as length × width × depth, with access and drainage shown separately.
For a proposed track-guided layout, an obstruction entering either track corridor calls for a layout review. For a recessed mechanism, compare the measured available envelope with the selected mechanism and service-access drawing before civil work. Keep the required dimensions on request until that configuration is selected.
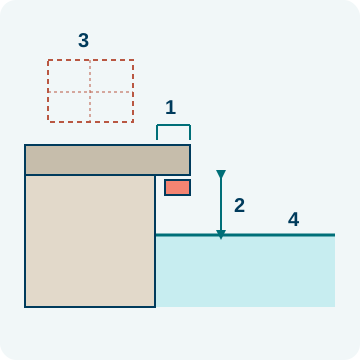
1: coping projection from the inside face.
2: vertical reference to the waterline.
3: separate available equipment envelope.
4: waterline; note skimmer or overflow.
Link each site photo to the plan
Take overall views from opposite ends and close views of each edge constraint, obstruction and proposed mechanism location. Mark every photo ID and viewing direction on the sketch. Include a visible measurement reference in the relevant detail photo, with its endpoints unobscured.
Ordinary site photos help explain measurements; keep the dimension record alongside them. A manufacturer’s photo-measurement process uses its own capture instructions and processing. Request that process explicitly if proposed for the selected cover.
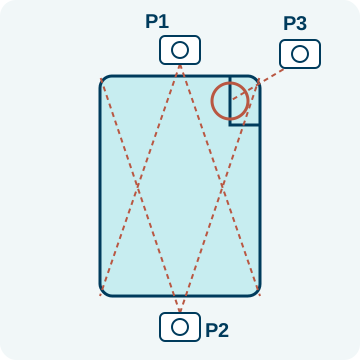
P1: overall view from one end.
P2: reverse overall view.
P3: detail located on the drawing.
Build one measurement pack for the quotation
Use the blank CSV as a field record, then attach your labelled sketch and photo files. Fill unknown fields with “to confirm”. Keep one unit throughout, and record a revision whenever site conditions or finishes change.
| What to send | Why it is needed | Example format |
|---|---|---|
| What to sendProject, city, contact, stage and cover type | Why it is neededIdentifies the inquiry and whether construction can still change | Example formatProject reference; city; new build / retrofit; automatic / manual |
| What to sendPlan, units, reference faces and measured dimensions | Why it is neededMakes each number traceable and repeatable | Example formatAB: [site value] mm; AC: [site value] mm; Rev A |
| What to sendSteps, corners, levels, edges and obstructions | Why it is neededLocates features that affect the arrangement | Example formatDetail S1; step sketch; P3.jpg |
| What to sendHousing/roller space, access and services | Why it is neededDefines available space for configuration review | Example formatAvailable L × W × D; access sketch; drainage/power route to confirm |
| What to sendPhoto map and original files | Why it is neededConnects the physical condition to a plan location | Example formatP1.jpg; P2.jpg; P3.jpg; drawing revision |
| What to sendVerification and open items | Why it is neededPrevents an early estimate becoming an unverified order | Example formatMeasured by; date; pending finishes; final drawing approval |
Confirm the drawing before custom production
Send the pack for quotation review, then resolve the open items against the proposed configuration. The installing contractor checks the final site dimensions, structure, drainage, electrical provision and access against the confirmation drawing. Record the drawing revision, verifier and written approval before releasing custom production.
If coping, tiling or equipment positions change afterwards, update the record and reconfirm the affected dimensions. Do not carry a superseded WhatsApp dimension into a production instruction.
Keep site work visible in the quoted scope
Ask the quotation to separate cover supply from civil changes, drainage and electrical work, installation, handling access and later replacement parts. Missing edge or housing information can lead to another measurement visit or a revised layout; record who owns each open item before comparing offers.
Keep the approved drawing and component record with the installed system. They give future replacement inquiries a usable starting point.
Send the labelled measurement pack
Include the project city, cover type, plan revision, dimensions and photo map. Open WhatsApp first, then attach the files and identify the items still awaiting confirmation.
Send cover measurementsMethod and sources
Updated October 2026. The sheet organizes preliminary quotation inputs and local drawing approval. The diagrams explain measurement references; the rectangular calculation is a labelled assumption. Product clearances, fixing requirements and service details come from the selected configuration documents.
- OEM track and coping guidance: recessed-track planning and parallel deck-track layout, read 18 October 2026.
- OEM measuring checklist: record steps, ladders, handrails, spas and waterfalls, read from the local archive and current source.
- OEM photo-measurement instructions: controlled capture differs from ordinary site photography, read 18 October 2026.